Hello fellow bloggers! What a year it has been so far. Have been busy working plus took on extra study (to do in my "spare time") in order to benefit my current position at work. So I have now successfully completed a Certificate 4 in Accounting. It was well worth doing but quite time consuming which meant my hobbies had to be set aside for a while. But now that my course is finished I can get stuck back into my favourite pass times again :)
I have managed to make a fair bit of progress on Santa since my last update. Check him out:
Am currently working on the bottom left hand side of the window frame, which is a smaller section than the above framed panels which is exciting. Looking at the pattern there doesn't seem to be too much back-stitch so I should be well on the way to finishing this gorgeous design :)
I actually found this Dimensions Kit available for sale at Everything Cross Stitch, they have a large range of beautiful cross stitch kits which I must admit I have been admiring lately. If you were interested in creating this design keep in mind the cross stitch threads supplied with the kit did not seem to be enough, I have had to buy more of every colour! I have checked back at the instructions a number of times to see if I have misread and unknowingly used too much thread but I don't think I have... Anyway, after numerous trips to the local craft store I have managed to match the colours to those in the kit, at least as close a match as possible. I'm not too concerned if the thread colours are not an exact match as there is a lot of colour blending in this design so it will not be too noticeable if the colours are slightly different :)
Sunday, September 16, 2012
Sunday, January 29, 2012
Fabric is bunching - any ideas?
I am having a bit of trouble sewing part of a quilt block together. The seam is catching underneath, here is a pic:
I have tried adjusting the presser foot but that doesn't seem to make a difference. I pin the seams down and take the pins out as I near the seam but it still bunches... Does anyone have any tips to help prevent it catching and bunching?
Saturday, January 28, 2012
Santa cross-stitch progress pic
Quick post to show off a pic of Santa's progress. The top of the Christmas tree and Santa's glove with candy cane in tow are now visible, hooray! Am currently stitching the window frame of the design then will continue to fill in the rest of the right hand side, which comprises mostly of the Christmas tree, more green threads! I am adamant my next cross stitch will not contain green, or if it does it will be very minimal lol. Actually, come to think of it, I think I know which design I will make next. I purchased a Frangipani cross stitch kit years ago and from memory I don't think it does contain any green :) It looks like quite a simple, quick design to stitch too which will be a refreshing break from the more complex cross stitch kits.
Mystery Folk Art Revealed
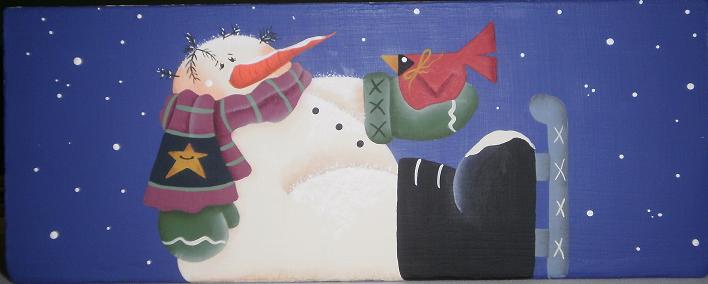
Now I know I posted a long time ago about this painting and couldn't post any pics because it was a Christmas present for my Mum, of which she loved by the way. Now that Christmas is over and the surprise has been revealed here are some pics I took along the way:
This was painted on a wooden tissue box cover and has a different painting on the other side which looks like this:
This design was created by Renee Mullins, as are the majority of the paintings I do; I cannot get enough of her designs, they are simply gorgeous! This is no exception and was a lot of fun to paint. The blue background is the perfect colour for a tissue box holder as the tissues actually look like snow on top.
This was painted on a wooden tissue box cover and has a different painting on the other side which looks like this:
Tuesday, December 13, 2011
Santa cross-stitch update
Have made a fair bit of progress on the Santa cross-stitch since my last cross-stitch post. I am determined to get this finished as it has been a long while in the making. Plus I have since purchased a number of other cross-stitch kits (yes I know I am a sucker, but secretly aren't we all lol) and I am not allowing myself to start any of them until this one is done, otherwise I know I will never finish it and it would be a shame to leave it incomplete.
I am so glad to have finished the greenery at the top. There was so much of it! And with up to 5 strands for some colours it seemed like it would never come to an end. I must admit though, the dense tree effect does look impressive so it was worth the time spent on it.
Bears Paw finished quilt
Well, the Bears Paw quilt is finally complete!!! The quilter did an absolutely amazing job! The quilting around the applique in particular has really made it stand out. Here's a few pics:
I don't know about everyone else but seeing one of your projects completed is always so motivating to start on the next one (of course I have already started on the next quilt, who could possibly resist :)
Monday, December 12, 2011
Owls
Hi everyone! Didn't realize it had been so long since my last post. Those of you who follow Bec's Cross-stitch creation blog would have already seen pics of the Owls I painted for her, a little while ago now. I know Bec is a fan of owls so I just couldn't resist the chance to paint a few for her :)
Below are some progress pics of the paintings. The owls were painted on a wooden door hanger. These are always great to paint on as they are quite small, which means whatever design you choose will be very quick to paint, and you can have your painting up on display in no time. The flat surface is wonderful also, no tricky corners to get your brush into when base coating the background colour or varnishing at the end of the project. It is so much easier to be able to rest your hand on a flat surface also, unlike when painting a wooden tissue box cover for instance.
I decided to paint one owl on either side, that way the door hanger can be flipped over at any time for a different look.
You will notice Baci is a fan of my paintings. You can always count on him to supervise the latest craft happenings, gotta love our helpful feline friends!
Bec, I hope you are enjoying having the owl painting/s in your home.
In other news the Bears Paw quilt is now finished, quilting and all!!! Will post some pics up shortly.
Below are some progress pics of the paintings. The owls were painted on a wooden door hanger. These are always great to paint on as they are quite small, which means whatever design you choose will be very quick to paint, and you can have your painting up on display in no time. The flat surface is wonderful also, no tricky corners to get your brush into when base coating the background colour or varnishing at the end of the project. It is so much easier to be able to rest your hand on a flat surface also, unlike when painting a wooden tissue box cover for instance.
I decided to paint one owl on either side, that way the door hanger can be flipped over at any time for a different look.
You will notice Baci is a fan of my paintings. You can always count on him to supervise the latest craft happenings, gotta love our helpful feline friends!
Bec, I hope you are enjoying having the owl painting/s in your home.
In other news the Bears Paw quilt is now finished, quilting and all!!! Will post some pics up shortly.
Subscribe to:
Posts (Atom)